In today's digital age, the online marketplace continues to thrive, offering entrepreneurs a wealth of opportunities to bring their products to a global audience. Crafting an e-commerce store that seamlessly blends functionality, aesthetics, and performance is crucial for success in this competitive landscape. Fortunately, with the powerful combination of Next.js and Shopify, building an exceptional online store has never been more attainable.
In this article, we'll explore how to transform your e-commerce store idea into a fully functional platform, ready to engage customers and drive sales. By leveraging the capabilities of Next.js for frontend development and Shopify for backend management, you can create a robust and scalable online storefront that delivers an exceptional shopping experience.
The Power of React.js and Server-side Rendering Next.js is a popular React.js framework that offers server-side rendering, automatic code splitting, and route prefetching, among other features. This makes it ideal for building fast, SEO-friendly web applications with a seamless user experience. With Next.js, you can create dynamic, interactive interfaces while ensuring optimal performance and accessibility.
A Comprehensive E-commerce Solution Leading ecommerce platform Shopify offers merchants all the tools they need to launch, run, and expand their online stores. From product management and inventory tracking to secure checkout and payment processing, Shopify offers a comprehensive suite of tools to streamline the e-commerce workflow. With its robust APIs and customizable themes, Shopify enables developers to build tailored solutions that meet specific business needs.
Before diving into development, take the time to define your brand identity and product offerings. Conduct market research to identify your target audience, competitors, and unique selling propositions. Define your brand's aesthetic, values, and messaging to create a cohesive brand identity that resonates with your customers.
Creating a Shopify Account: Navigate to the Shopify website and sign up for an account. Fill in the required information, such as your email address, store name, and password. Complete the registration process and log in to your Shopify dashboard.
Customizing Your Store Theme: Access the "Themes" section in your Shopify dashboard. Browse the available themes and choose one that fits your store's aesthetic. Customize the theme settings, including colors, fonts, and layout, to match your brand identity.
Adding Products: Navigate to the "Products" area under the Shopify dashboard. Click on "Add product" to create a new product listing. Fill in the product details, including title, description, price, and images. Set up product variants, such as size, color, and quantity options.
Configuring Payment Gateways: Navigate to the "Settings" section and select "Payments." Choose the payment gateways you want to offer to your customers, such as Shopify Payments, PayPal, or credit card payments. Configure the payment settings and connect your payment accounts.
Setting Up Shipping Methods: Setting Up Shipping Methods: In the "Settings" section, select "Shipping." Define your shipping zones and rates based on regions and shipping methods. Configure shipping settings, such as shipping carriers and delivery options.
Managing Orders and Customers: Monitor incoming orders in the "Orders" section of your dashboard. Fulfill orders by processing payments, packing items, and arranging shipping. Keep track of customer information and interactions in the "Customers" section.
Launching Your Store: Review your store settings and make any necessary adjustments. Preview your store to ensure everything looks and functions as intended. When you're ready, click on the "Launch" button to publish your Shopify store and make it live to the public.
With your Shopify backend in place, it's time to design and develop your Next.js frontend. Create a visually appealing and user-friendly interface that showcases your products effectively. Use Next.js components and layouts to structure your pages and optimize for performance. Implement responsive design principles to ensure your store looks great on all devices and screen sizes.
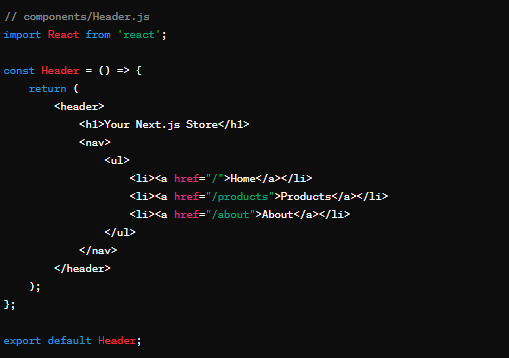
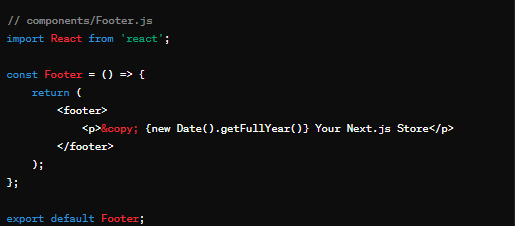
Creating Components:
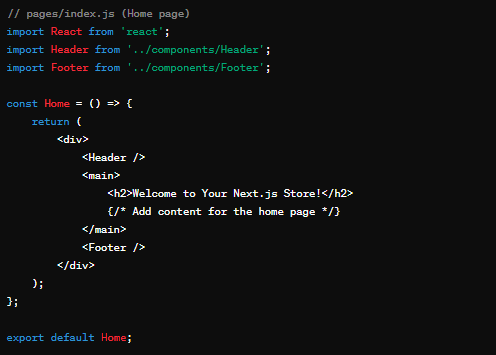
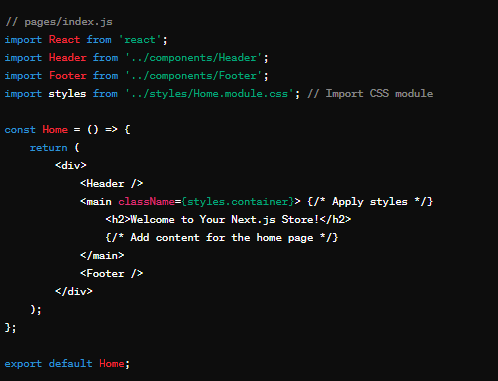
Creating Pages:
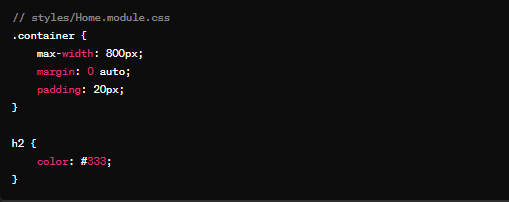
Styling with CSS:
Integrate your Next.js frontend with your Shopify backend to fetch product data and handle user interactions. Use Shopify's Storefront API to retrieve product listings, collections, and customer information dynamically. Implement features such as product search, filtering, and sorting to enhance the shopping experience. Leverage Next.js's server-side rendering capabilities to improve SEO and page load times.
Set Up Next.js Project:
Initialize a new Next.js project if you haven't already

Install required dependencies:

Configure Apollo Client:
Create a new file to configure Apollo Client, typically named apolloClient.js

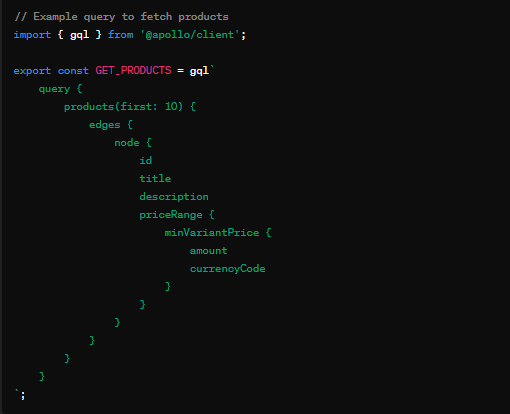
Query Shopify Data:
Use GraphQL queries to fetch data from your Shopify store. You can create queries for products, collections, and other resources:
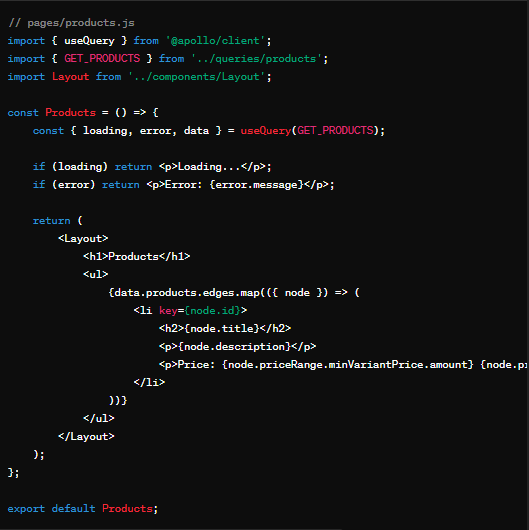
Integrate with Next.js Pages:
Thoroughly test your e-commerce store to identify and fix any bugs or issues. Conduct usability testing to ensure a seamless and intuitive user experience. Test your store's performance under various conditions, including different devices, browsers, and network speeds. Once satisfied with the results, launch your store to the public and start promoting it through marketing channels such as social media, email, and search engine optimization.
By leveraging the combined power of Next.js and Shopify, you can bring your e-commerce store idea to life and reach customers worldwide. From concept to customer, this dynamic duo empowers you to create a visually stunning, feature-rich online storefront that drives sales and fosters customer loyalty. With careful planning, thoughtful designing, logical custom web development and meticulous execution, you can craft an e-commerce store that stands out in today's competitive marketplace.